How to Upload PST to Microsoft 365 (With or Without Outlook)?

When users try to upload PST to Microsoft 365 manually can be challenging due to slow upload, formatting and increased manual efforts. To address the challenges, it becomes crucial to know reliable migration strategies. In this guide, we will show you a detailed comparison of manual and automated methods to import PST to Microsoft 365. After reviewing these methods, you can select the approach that best fits your data size and risk tolerance
PST (Personal Storage Table) plays a crucial role in modern environments especially for organizations managing large scale data, long term archiving and compliance requirements. Many organizations keep PST files for old emails instead of storing old emails on your computer.
Table of Contents
Why Do We Need to Migrate PST to Office 365?
Cloud apps like Microsoft 365 fully reliable for better accessibility, backup and security as compared to desktop email clients. Similarly, we are going to tell you below some other reasons why the user uploads PST files to Office 365:
- Office 365 users can access data at any time, from any location, using any device, because it is a cloud-based service. Additionally, data is backed up regularly using state-of-the-art security techniques. So, when you import PST to Office 365, you can enhance the remote work experience.
- Users can be easily managed and set up using Office 365. After the setup is over, you can start installing utilities. Either you or your IT partner can handle this yourself.
- When using Office 365, you can easily edit files, manage projects remotely, communicate with your employees from any location, and more.
- Import PST to Microsoft 365 keep you updated with the latest information. You no need to transfer your data again because Microsoft 365 allows for continued updates.
- For any business, data and documents are incomparably valuable. Therefore, losing any important information can sometimes lead to disastrous consequences.
- You can prevent such loss with the data protection and backup capabilities of Office 365. Because it’s the global leader in cloud security and privacy, Microsoft guarantees that all your data is secure in Office 365.
After knowing all the important reasons, now it’s time to go ahead and find out the solution. So, below we are going to tell you those solutions that will help you complete this task. Let’s start.
Quick Comparison Table: Which Method is Right for You?
| Method | Difficulty | Bulk Capacity | Speed | Accuracy | Risk level | Time Required | Best for |
| Network Upload(Azure) | High | TB-level | Medium | High | Medium-High | High | Enterprises and IT Teams |
| Outlook Import Feature | Low | Limited | Slow | Medium | High | Medium | Individual Users |
| Professional Tool | Medium | Unlimited | Fast | Very high | Low | Low | Businesses and Bulk Migration |
Also Read: Export Contacts from Office 365
How to Import PST to Office 365?
There are two ways to perform this task: the first is a manual method, and the second is an automated method. So generally, the most common manual way to upload PST files to Office 365 is by using network upload and drive shipping, which is provided by Microsoft for its users. The details of both methods are given below. Also, after this, we will know about an efficient and reliable solution.
First we will explain the manual PST import including step-by-step instructions and its drawbacks. So, perform it carefully:
Method # 1: Manually Import PST Using Network Upload
Microsoft provides its manual solution for importing PST files to Office 365. This method is completely free but requires high technical knowledge for its execution. If you are comfortable with the working of PowerShell commands, then this method can solve your problem. Perform the following steps carefully, as given below, to import PST to Office 365:
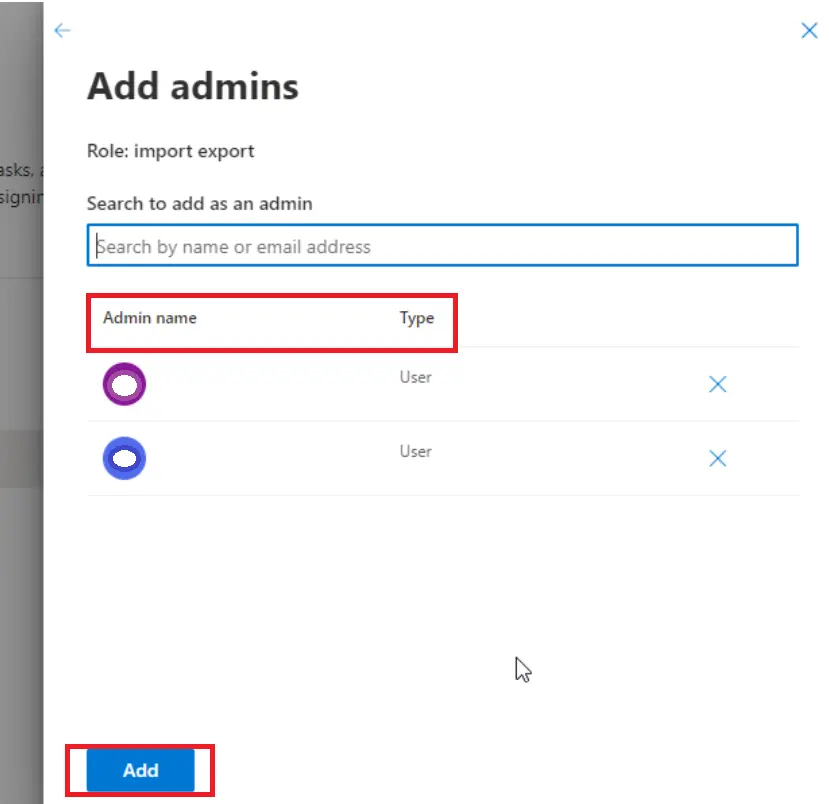
Stage 1. Assign Roles
- First, sign in to “Exchange Admin Center” and then, click on Roles >> Admin Roles >> Search >> Import Export.
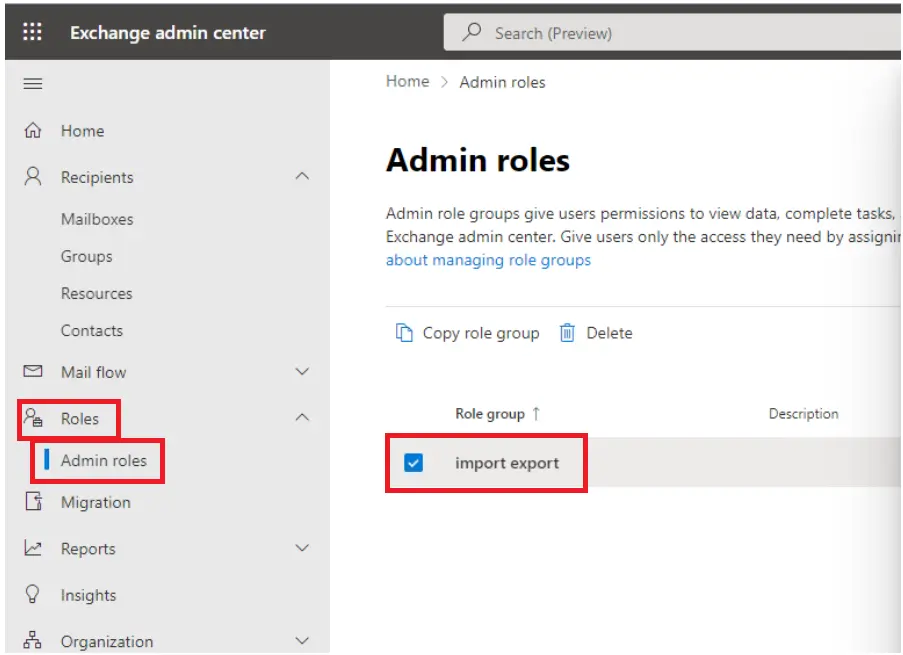
- Now, hit on the “Add” option under the “Assigned Tab” and then choose “User“.
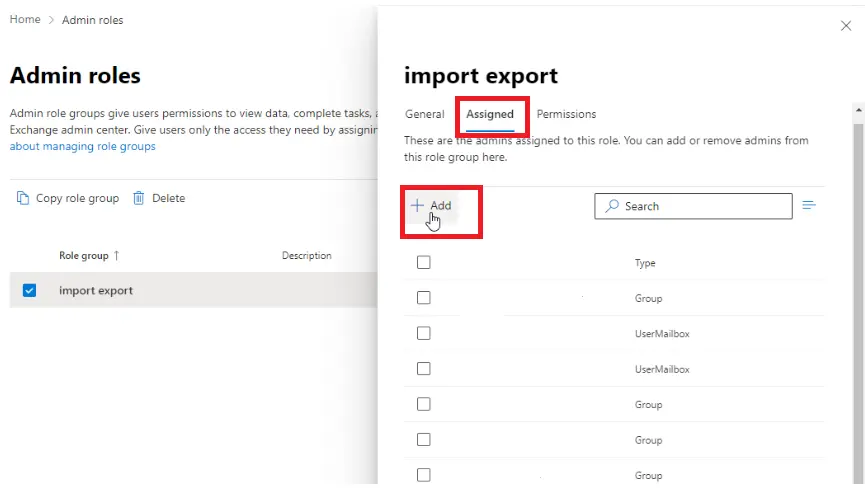
- Then, add the “Admins” and click on the “Add” button.
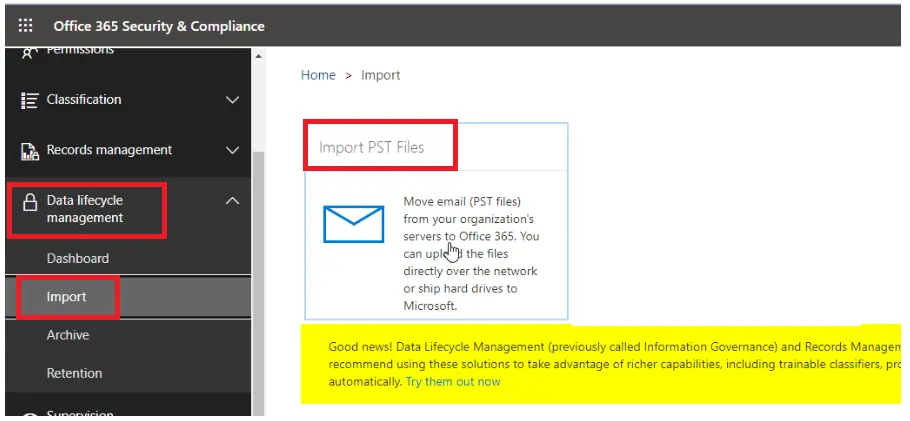
Stage 2. Make an Import Job
- To create an import job, visit Home and then click on the Data Lifecycle Management >> Import >> Import PST Files.
- Now, click on “+ New Import Job” and then enter “Job Name” and click on the “Next” button.
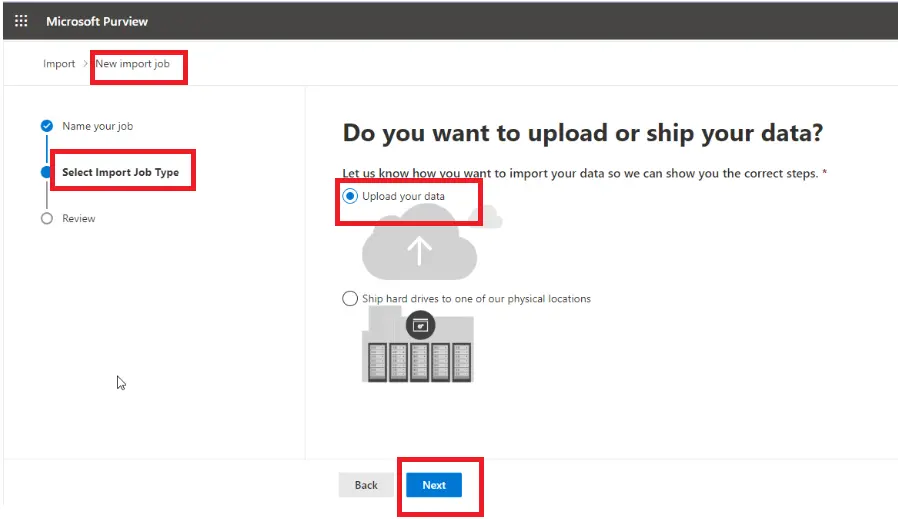
- Then select “Upload Your Data” >> “Next” under “Select Import Job Type“.
- After that, hit on the “Show Network Upload SAS URL” then press on “Next“
- Choose “Copy to Clipboard” >> “Download Azure AzCopy” tool on your Windows, Linux, and MacOS systems.
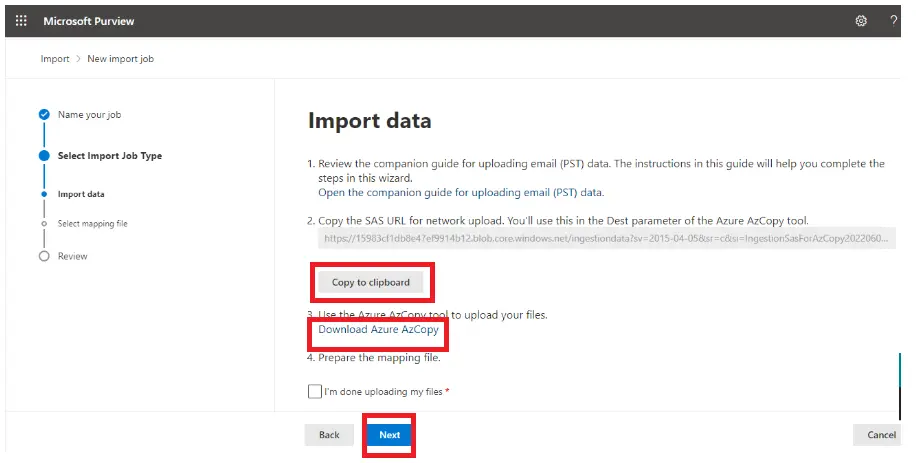
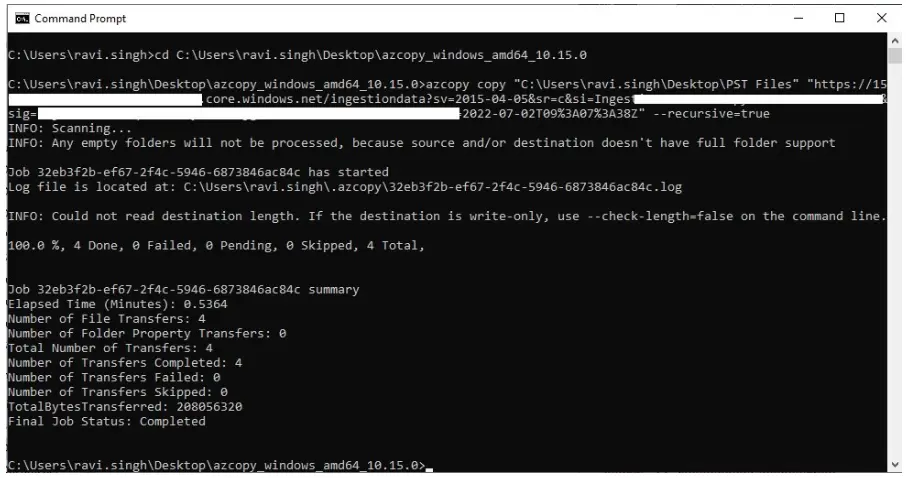
Stage 3. Upload PST in Azure Storage
- To import a PST File in Azure, move the tool to your desktop and copy the “Folder” that contains your PST file.
- Now, open “CMD Command Prompt” and find the “Extracted Folders azcopy.exe file” on your desktop.
- Then, run the command: “Azcopy copy “pathToFolder/ContainingPST” “SAS URL” –recursive=true” to upload the PST data file.
Stage 4. Verify the uploaded Outlook File
- After choosing Blob Container >> Shared Access Signature URL (SAS), paste the “SAS URL” you copied into the Blob Container SAS URL: field.
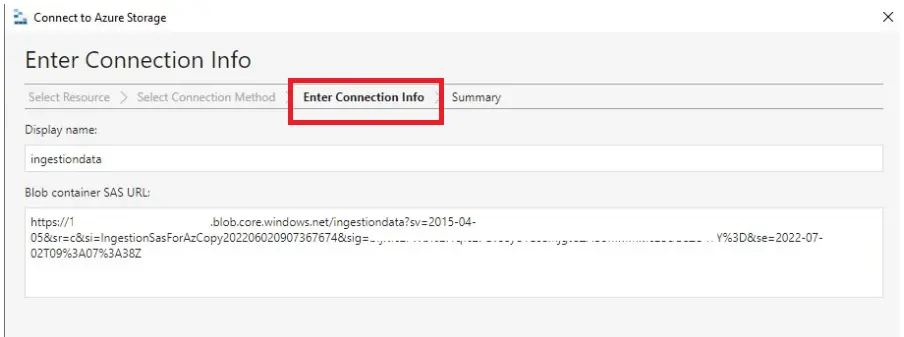
- Click Connect >> Next.
- You can “View” the “PST Folder” by selecting “File Shares“. Test by opening PST files.

Note: You will need to wait for the PST files to be uploaded to Azure Storage before closing it. When the process is complete. Make sure that the PST files do not exceed the recommended 20 GB size limit, as doing so may affect and disrupt the import process.
Method #2: Import PST to Office 365 Using Drive Shipping
Many non-technical users face difficulty in using the Network upload. Then, Microsoft provided another approach that doesn’t require much input from the user. All the complex commands and procedures will be done by Microsoft. To copy PST to Office 365 cloud using Drive Shipping, Microsoft will charge 2$ per GB of the PST file.
Basically, in the Drive Shipping method, users need to copy the PST files to a hard drive, and then they can physically move or ship the hard drive to the Microsoft data center. Moreover, it is an efficient technique to move a bulk amount of Outlook emails to Office 365. It can also transfer large amounts of the archive mailbox data items to the organisation.
Method #3. Use Outlook
- Step 1: Start by setting up your Office 365 account in Outlook.
- Step 2: Open Outlook, go to the File menu, and click it.
- Step 3: From the menu, select Open & Export.
- Step 4: Choose Import/Export, then pick Import from another program or file (this is selected by default).
- Step 5: Select Outlook Data File (.pst), browse for the PST file you want to bring into Office 365, and select it.
- Step 6: Specify the destination folder for the import and click Finish to complete the process.
Method #4. Use PowerShell to Import PST to Office 365
#Stage 1: Storage Setup
- Step 1: In Office 365, navigate to Import Service > Data Migration.
- Step 2: Click the Upload PST option.
- Step 3: Next, click the + icon and choose Upload email messages (PST files).
- Step 4: For your initial import, a storage account will be created. Click Show network upload SAS URL to generate it. This URL includes:
- Storage Account Name
- Container Name
- Shared Access Signature (SAS): Contains details such as sv (storage service version), se (expiration date), sr (storage type), si (storage identifier), and sig (signature). The Azure AzCopy Tool uses this URL for PST uploads.
#Stage 2: Uploading PST Files to the Office 365 Account
- Step 1: Open Azure Storage Explorer and connect to it.
- Step 2: Provide the Shared Access Signature (SAS) URL or an account key to establish the connection.
- Step 3: After entering the SAS URL, review the Connection Summary.
- Step 4: Use Azure Storage Explorer to upload your PST files.
- Step 5: To view the uploaded files in Azure, run the following command:
New-AzureStorageContext -SasToken ($SharedAccessSignatureURL -split ‘\?’ | Select-Object -Last 1) -StorageAccountName ($SharedAccessSignatureURL -split ‘\.’ -split ‘//’)[1] | Get-AzureStorageBlob -Container ($SharedAccessSignatureURL -split ‘\?’ -split ‘/’)[3] | Select-Object -ExpandProperty Name
#Stage 3: File Mapping
After successfully uploading the PST files to Azure Storage, you’ll need to create a CSV mapping file.
#Stage 4: Import PST to Office 365
The final step is to import the CSV mapping file. Click Finish, and your PST files will be transferred to the Online Archive in Office 365.
To track the import status, run the following command:
Get-MailboxImportRequest | ForEach-Object -Process {
Get-MailboxImportRequestStatistics -Identity $_.RequestGuid
} | Select-Object -Property BatchName, TargetAlias, StatusDetail, StartTimestamp, OverallDuration, TotalInProgressDuration, EstimatedTransferSize, PercentComplete, @{Label='File';Expression={$_.AzureBlobStorageAccountUri | Split-Path -Leaf}} | Out-GridView -Title "PST Import Progress"
Limitations of these Manual Methods
There are some drawbacks to these manual techniques for importing PST files to Office 365. Here, some of the major disadvantages of manual processes are given:
- The Office 365 import service is available for a limited countries.
- Manual methods need to follow lots of steps that are time-consuming.
- It is difficult to upload large PST files using manual procedures.
- Technical knowledge is required to understand complex manual methods.
- Any mishandling of the steps may lead to file corruption or deletion in Office 365.
- Strong knowledge of PowerShell commands is required for execution.
This is where all human method ends. Now, if you are going with the above-mentioned steps, then you will have to face a lot of choices. Which we have already told above. So, if you do not want to face any kind of loss, then try the automated method mentioned below.
Method #5: Import PST to Office 365 Using an Automated Tool
To overcome the above-discussed drawbacks of manual solutions, it is highly suggested to choose reliable third-party software like the Outlook to Office 365 Migration Tool. This is a very beneficial tool that can easily upload Outlook PST files to the Office 365 account. In addition, the software provides a self-explanatory user interface that makes the entire migration process facile and easy for the users.
The software is capable of uploading complete emails, contacts, and calendars from Outlook to Office 365. It is also supported by all versions of the Windows operating system. Additionally, while importing PST to Office 365, the tool provides multiple filtering options to upload only selective data from PST files.
Steps to Import PST to Office 365 Cloud Platform
To upload the Outlook PST files to your Office 365 account, you need to perform the following steps that are given below:
- Step 1. First, Download and run the Office 365 PST Import tool, and then provide the Source platform as PST and the Destination Platform as Office 365 in the software.

- Step 2. Then, select the category from the workload selection bar and select the specified date from the date range filter option.

- Step 3. Now, provide the PST file as a structure “E:/PST/” into the software as “Import Folder Path” and Validate.

- Step 4. After that, the software asks for certain permissions. Mark them all and proceed by clicking on Next.

- Step 5. Now provide the Office 365 details [Admin Email & Application ID] to the software and Validate the correct permissions.

- Step 6. Provide the necessary permissions that will be granted to the admin account.

- Step 7. Now you have landed on the user screen. Here you will find different ways, like Fetch Users, Import Users, and Download Template. These can add users from the source account that need to be processed.

- Step 8. A list of users will now be visible on the screen. You can search for a particular mailbox here, and through the “Show Selected” toggle bar, you can import selective data only.

- Step 9. Lastly, validate and click on Start Import to import PST to Office 365.

Advanced Features of Outlook PST to Office 365
- This advanced software has admin and user login options, which can allow admins and users to handle the PST to Office 365 migration.
- The software is specially designed to import complete data from a PST file. It can also provide various file formats and cloud format options, such as the ability to migrate MSG to G Suite account directly. You can select according to your requirements.
- It has multiple other file formats, like EML and MSG. It can support these file formats in the migration process.
- It has an easy option for mapping PST files and their associated user accounts.
- You also have the option to migrate PST files into Office 365 shared mailboxes using an admin account.
- It has an incremental import option feature that can skip already imported data.
- This software has advanced categories and data filters for selective data import from PST files.
- The software also gave you the option of downloading the report of the full import process.
Critical Challenges in PST Migration
- The main challenge appears when uploading PST files to Microsoft 365 as it often makes changes with your data files like headers, message body, and other data.
- Microsoft 365 applies attempts on API requests and data upload, which can stuck the migration process or temporarily block large PST files..
- Corrupted PST files often show errors, preventing importing and requiring repair tools to make it healthy to recover Outlook data.
- When trying to import PST multiple times it can create duplicates when not performing carefully and requiring additional cleanup efforts.
Wrapping Up
Let’s conclude as now it depends on you which solution really suits your needs. Manual approach fully reliable for small, single mailbox imports but can be slow down and error prone.
The enterprise approach requires technical skills and Admin Access. Professional Tools are the safest way to handle bulk migration as it is known for accuracy and no risk of data loss when uploading PST to Microsoft 365. Always ensure PST file status is healthy or not before beginning the process.
Frequently Asked Questions
Q. How do I import PST into Office 365 directly?
If you need to import PST files into Office 365, then follow the steps mentioned below:
- Download and launch the specified software
- Provide source as PST Files & Authenticate
- Provide destination O365 & Authenticate
- Provide necessary permissions and validate
- Tap Start Import to import PST to O365
Q. Is it possible to import multiple PST files into O365?
Yes, you can easily import data from batch PST files into an Office 365 account using the mentioned tool.
Q. How do I import PST to Office 365 without an internet connection?
You will be unable to move the mailbox to Office 365 if there is no internet connection.
Q. Can I import only specific folders from PST?
Yes, you can import a specific folder from a PST file. During the import/export process you can choose the folder as you want to import.
Q. Why is my PST import stuck?
PST import can stuck due to large file size, poor internet or Microsoft upload limits, or PST file corruption, processes are also process stuck or failed.