How to Fix Exchange 2016 Mailbox Size Exceeds Target Quota?

Summary: The article discusses a quick solution to troubleshoot Exchange 2016 mailbox size exceeds the target quota. This blog also suggested the best method to fix archive size that exceeds the target quota in exchange 2010, and 2013 versions with the help of Exchange Control Panel and Exchange Management Shell. It also explains the issues which occur when the exchange mailbox exceeds mentioned quota limit.
Let us all take a look at the User Query (which we got from the Technical Forum) and some important things. So, that it is easy for us to solve the exchange 2016 increase mailbox size problem. So, let’s cover things moving down.
User Query:
Hello,
I need help with an issue in Exchange 2016 where some users’ mailboxes have grown larger than allowed. I’d like to know how to choose a mailbox size, how to modify the restrictions if necessary, and how to put into practice best practices for managing mailbox sizes. We sincerely appreciate your advice and assistance.
Exchange 2016 Mailbox Size Exceeds – Common Issue
There are several reasons why it is important to fix the Exchange mailbox size when it exceeds the predefined limits. Here are some key reasons:
- Efficiently managing mailbox size maximizes storage utilization and reduces unnecessary consumption of resources.
- By addressing mailbox size issues, users can easily access and retrieve their email without delay or interruption.
- Managing mailbox size ensures compliance with retention policies and regulatory requirements.
- Large mailbox sizes can overload servers, causing system instability and possible downtime.
- This may be due to an increase in data file size of Exchange has become corrupt or damaged due to which you are not able to see your data.
After knowing all the things from the above part, now it is time to go through all the solutions to solve the Exchange 2016 increase mailbox size, then, below and we have mentioned all the tested approaches stepwise.
Also Read: How to Fix Exchange Server Error Code 8224
Exchange 2016 Mailbox Size Exceeds – Quick Tricks
By default, the size of Microsoft Exchange Version 2016, 2013 has a storage capacity of approx 2 GB. This storage space is shared by all users configured in the exchange database. It is very hard for exchange administrators to manage space as per user requirements.
When the exchange mailbox size exceeds the predefined limit or default storage limit then a message with a complete description is received by the mailbox user. Thus, it causes a stoppage of any communication, as it does not have enough space to store send or receive mail data.
If the mailbox is shared between multiple users then in such cases 2GB of data or a predefined size is not enough. Every user has their preferences & usage. In this blog article, you will get to know how to increase the size of the mailbox at the user level as well as the global database level. The complete procedure to fix the exchange server 2016 mailbox that exceeds the size limit can be completed with the help of the Exchange Control panel as well as Exchange Management Shell.
Read More: Resolve Exchange Transport Service Keeps Stopping & Restarting
# 1: Define the Size of the Mailbox via Exchange Control Panel
Here is the complete exchange 2016 increase mailbox size at the user level with the help of the Exchange control panel.
- Open Exchange 2016, 2013 Control Panel
- Then in recipients, select the mailbox user for which you exceed the limit size. Click on the Edit button to open the properties.
- Select Mailbox usage to increase exchange 2016 or 2013 mailbox size. Then click on more options to define the desired size of the mailbox.
The size of the mailbox of a particular user is predefined by the database limit settings. Please ensure first that customize quota settings are selected and limitations are set in GB format. There is also the option to set the size to unlimited for customized quota settings option. The changes which you are making here are directly highlighted in MS Outlook or other else.
# 2: Define Exchange Mailbox Size in Database Level
If you are making any changes in the mailbox quota at the database level the changes are automatically updated in all mailboxes that existed on the database. Follow the procedure below:
- In the same Exchange Server control panel, click on the servers & database for which you want to upgrade quota limits. Then clicking on the Edit button to open the properties of selected data.
- In properties click on limits and set the size of the selected database. The changes which you are going to make here are automatically reflected in all mailboxes existing in the database.
You can also verify the status of each mailbox that is connected to the database. The changes are immediate. But sometimes it takes time to reflect because of database sizes. This is the complete method user can troubleshoot Exchange 2016 mailbox size exceeds.
More Information: How to Fix Exchange Database Failed to Mount Error
# 3: Manage Mailbox Storage With Exchange Management Shell
The mailbox can also be defined with the help of an exchange management shell. For this, you need to UseDatabaseQuotaDefaults parameter to $false so that default settings do not override custom settings.
The Terms being used in Exchange Server Management Console to Set Size
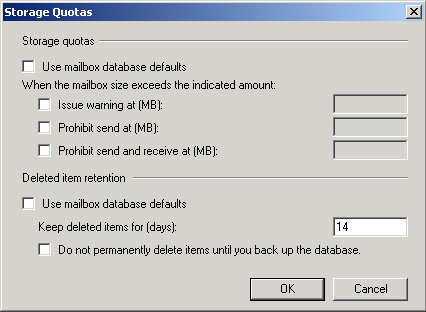
- IssueWarningQuota:
Maximum Size after which a warning message generates - ProhibitedSendQuota:
When the mailbox exceeds this size limit then the user does have the right to send mail - ProhibitedSendReceiveQuota:
Mailbox owners do not have the right to send or receive mail. If he tries to do so then it automatically gets back into account with error messages.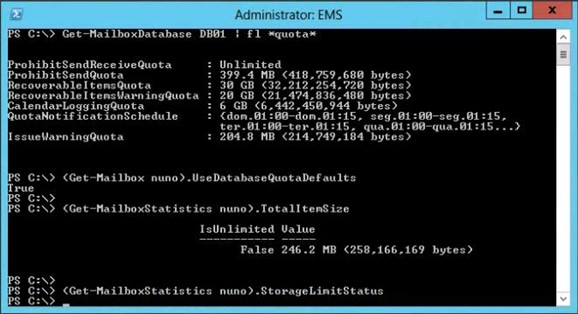
Lets us take the scenario in which a user named justin hansen has to set a quota for the mailbox as
The warning message delivers at 30GB and Sends message service stops at 32GB and receives quota stops at 35 GB.
“Set-Mailbox -Identity “Justin Hansen” -IssueWarningQuota 30gb -ProhibitSendQuota 32gb -ProhibitSendReceiveQuota 35gb -UseDatabaseQuotaDefaults $false”
# 4: Check the Status of Customized Settings
Use the inbuilt functionality available in Exchange Server to check whether the changes have been implemented successfully or not through the Exchange Management Console.
“Get-Mailbox|fl IssueWarningQuota, ProhibitSendQuota, ProhibitSendReceiveQuota, UseDatabaseQuotaDefaults”
# 5: Verify Via Exchange Admin Center
- In the exchange admin panel, go to recipients and then mailboxes
- Choose the mailbox for which you want to verify the storage quota.
- Then, click on edit.
- In mailbox properties, click on mailbox usage & then click on more options
- Then, verifies customized settings for selected mailboxes.
- Verify storage quota limits.
Note: If you feel that the EDB data file from Exchange has been corrupted or damaged due to which you are not able to see your imported data, then, you should use this Best Exchange Mailbox Recovery Tool. It is very reliable and profitable. Also, you can use its demo version.
If your data file has become big you have to face many unwanted problems. So, you convert EDB data file to PST and during conversion, you can split the EDB files into multiple files. So, to do this choose the solution mentioned below.
Try this Best and Most Valuable Solution
To convert EDB files to PST, EDB to PST Converter is the best converter for you. This tool has been tested by great IT administrators and can be used by any technical and nontechnical user. Also, you can choose to split the EDB file into different parts during EDB to PST conversion. Moreover, you can transfer your Exchange mailbox items, such as Contacts, Calendar, Tasks, Journal, and Notes to Outlook PST instantly without any data loss.
How to Use Tool – Guidelines
- First, Download and install the software on your system to start the conversion process.
- Then, click on the “Add File” button to add an EDB file in the software panel to convert it into PST.

- Now, you can “View All EDB Mailboxes” and their data items.

- After that, choose “PST” as an export type and then, click on “Advanced setting“.

- In the setting, you can choose the “Split” option to split the EDB file.

- Finally, “Browse” the location and click on the “Export” button to end this process.

Remember: If you have a lot of redundant data in your Exchange database. Then, you can delete that data to prevent your Exchange from growing above the size limit. After that, you don’t need to fix the Exchange 2016 increase mailbox size problem.
Time to Conclusion
We have given all the tricks to solve Exchange 2016 mailbox size exceeds problem in the technical blog, with the help of which you will very easily solve the problem of Exchange 2016 increase mailbox size without data loss. Along with this, we have also told you about EDB to PST conversion in the blog.